
My big brother got married last weekend! Everything was absolutely beautiful, and we had so much fun. It was so great to see family, friends, and to meet new people. Congrats, Chris and Erin! I love y’all and am so happy to have Erin in the family!  Lets flashback to a few weekends before the wedding and fun couple’s shower we had for Chris and Erin. My parents wanted to throw a shower for the happy couple, so I volunteered to jump in and help with whatever I could. Our theme was “I Do BBQ,” so I got started on making invitations and sending them out. After a little planning, we all got together in Baton Rouge for the party, and everything came together great!
 Mom and Dad handled most of the food, but I quickly volunteered to help out with the sweets! After all, you can’t have a party without lots of desserts. Since we would be flying in for the party, I needed to make something that could travel well, and sugar cookies seemed like the perfect option. I have been following several ladies on Instagram who make sugar cookies for a living (they are so talented!), so I was feeling creative and inspired! For my cookie recipe, I went with a trusty recipe I found on Pinterest last year. I have tried several different recipes for sugar cookies, but I just keep coming back to this one by Country Living. After making a mess in the kitchen with a double batch of cookies, I settled down at the table to get started icing. The fun part! I designed three different cookies based off of different parts of the invitation – a heart, a square, and a round cookie. I ended up having 25 of each. That’s a lot of cookies to decorate!
  To try and coordinate with the wedding colors, I decided to go with white, blue, and a light gray for the icing colors. After outlining and filling the cookies with royal icing, I let them sit for about 12 hours to dry. For the heart cookie, I wanted a very simple design. So, I iced the cookies white and wrote “love” in script. To add a little definition and finish out the design, I did a simple outline around the edge of the heart in gray.
  One set down! For the square cookies, I went with blue icing and wrote “I DO” in the middle. The font I used for this cookie was the bold, main font on the top of the invite. To help me make sure I stayed in the center of the cookie, I laid toothpicks down for a boundary to write inside. Nobody wants lopsided looking cookies!
  Once the “I DO” was dried, I went back and added a curly border on the top and bottom of the cookie in white.
 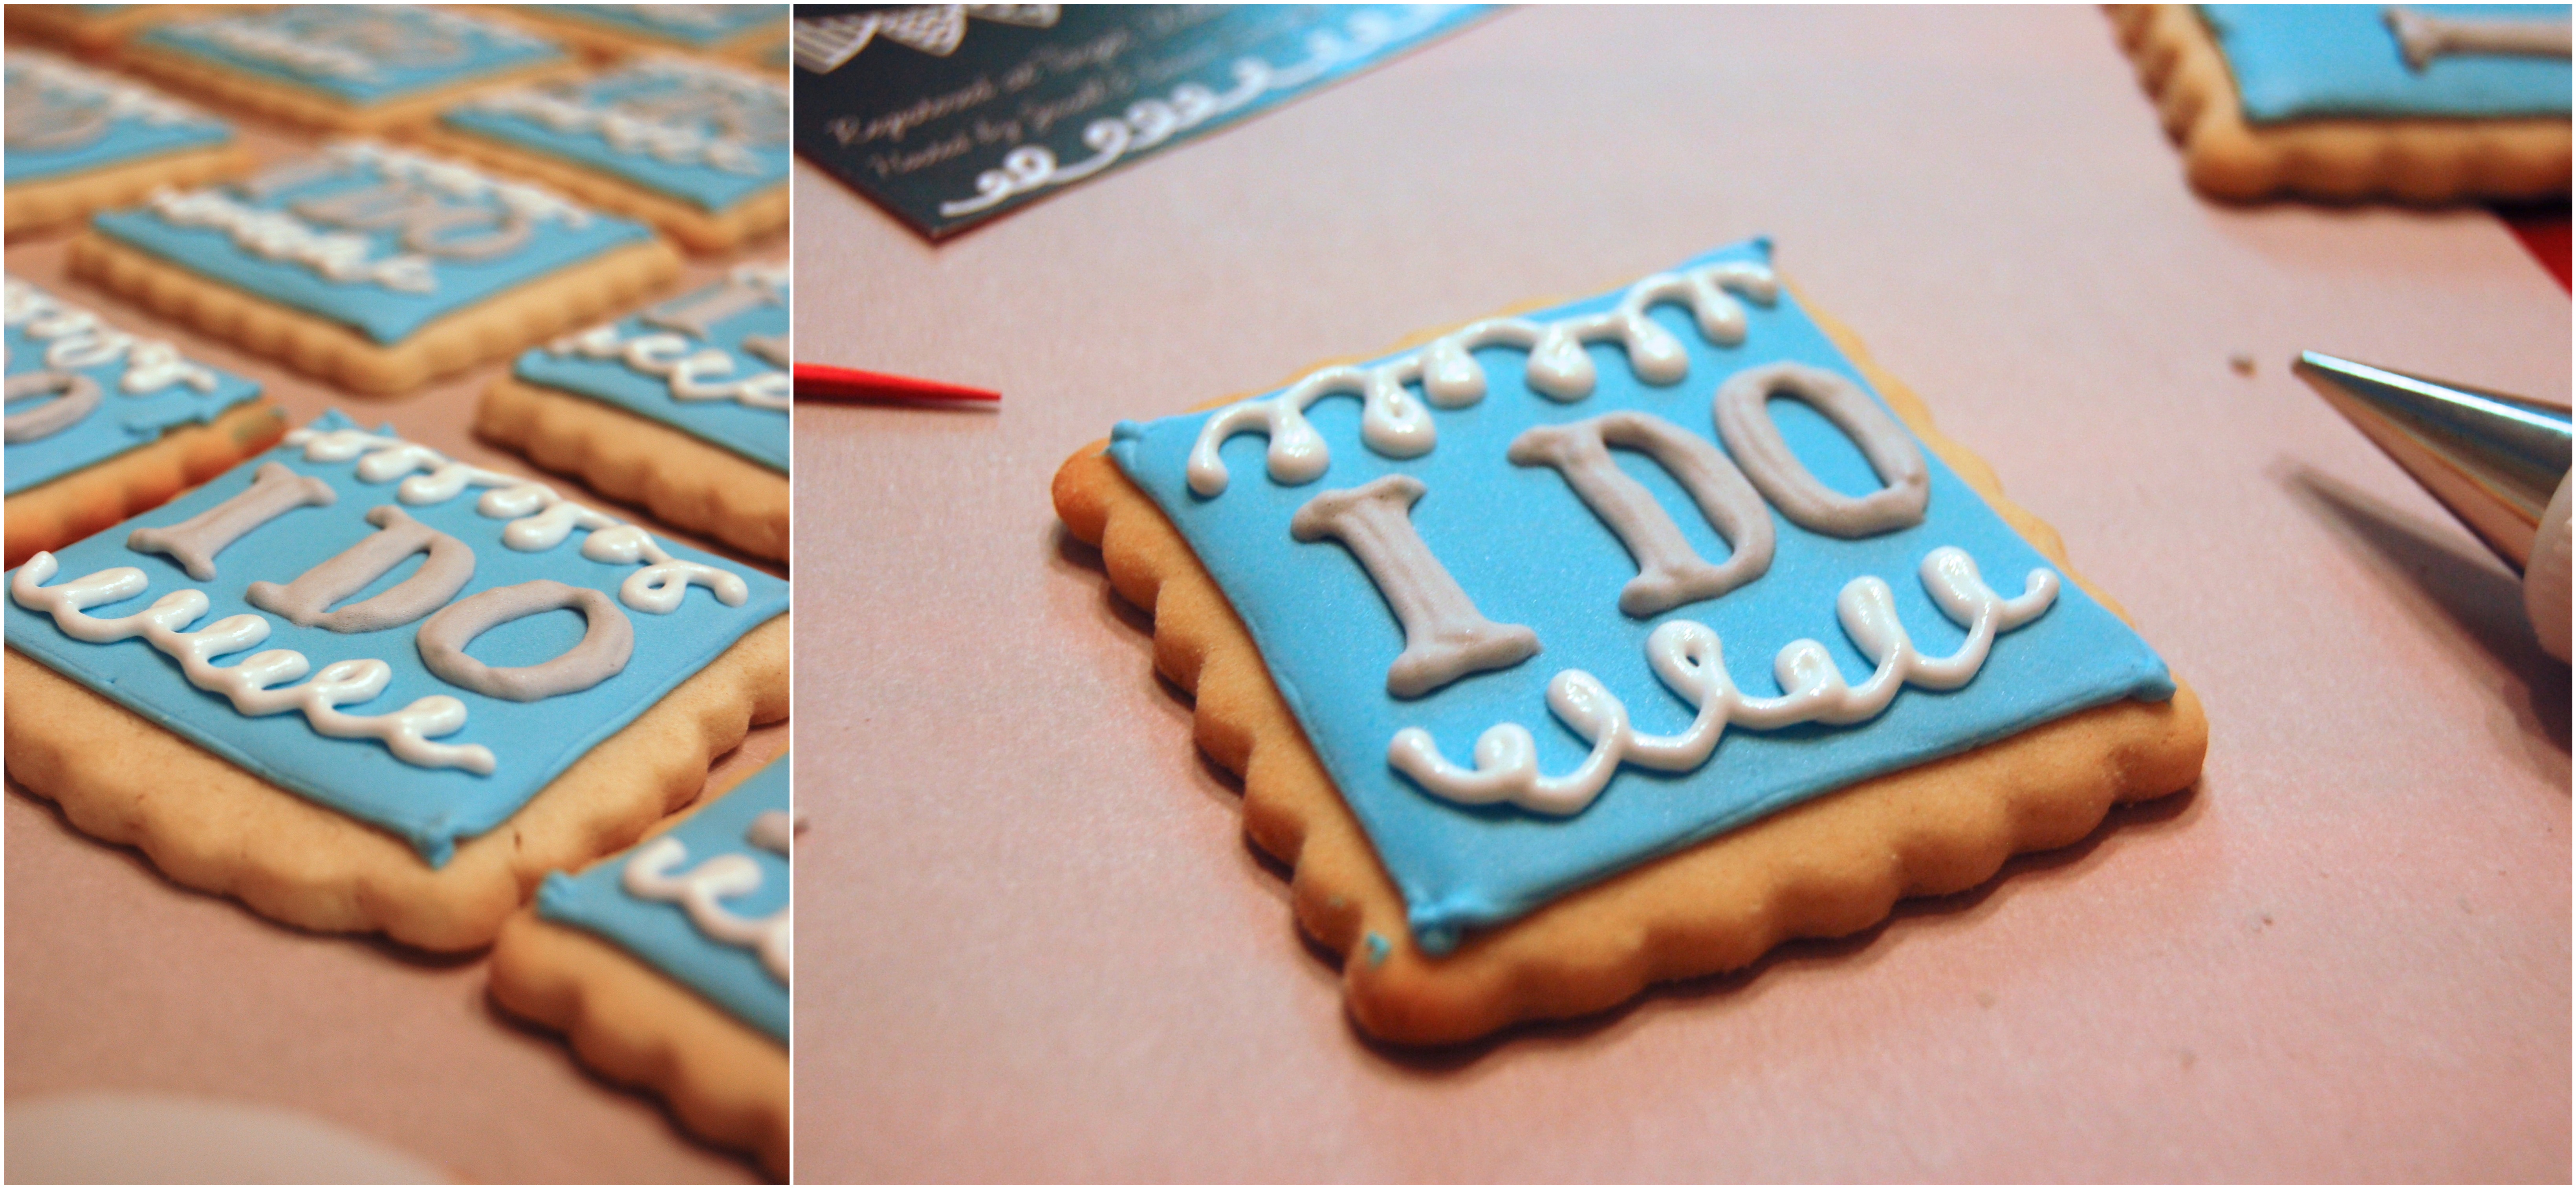 The square cookie ended up being my favorite. I love how the final look came out; I was just so proud of this cookie! For the round cookie, I wanted to make a fun banner that draped across the cookie. First, I iced the cookies gray and then added a white string.
  For the banners, I spaced each flag out with little dots of icing and then connected them. Once the banner was drawn, I filled it in and then smoothed the icing out with a toothpick.
 To finish these up, I added some white detailing on top of each flag.
  I was so happy with how these all came out – really fun and cute!
 Once all of the cookies were finished and dried, I carefully boxed them up and we headed over to Baton Rouge for the party. I was a little worried about transporting the cookies and going through security, but everything was fine! This was the tastiest carry-on I’ve ever had!
  On the day of the party, we spent the morning hanging out and getting everything ready. And watching lots and lots of football. Hey, it’s a Saturday in the South!

 I wish I had taken more photos of the food because it was just so good. Mom and Dad may have to start a catering business..
 Thank you so much to everyone who came out to celebrate Chris and Erin! We had so much fun, and I couldn’t be happier for them! Congrats, you two!
Country Living Sugar Cookies
Ingredients
- 2 sticks unsoftened butter
- 1 cup sugar
- 3 large eggs
- 1 1/2 tsp vanilla
- 1/2 tsp salt
- 3 1/4 cups all-purpose flour
Directions
- In a large bowl, using a mixer set on medium-high, beat together softened unsalted butter and sugar until fluffy. Add eggs, one at a time, followed by vanilla extract and salt. Reduce mixer speed to low and gradually add all-purpose flour, beating until ingredients are combined. (Dough will be slightly sticky.)
- Divide dough into 4 equal portions and cover each in plastic wrap, patting into 1/2-inch-thick squares. Chill until firm, about 2 hours or overnight.
- Preheat oven to 400 degrees F. On a floured surface, roll out dough, a square at a time, to 1/3 inch thick. Cut out cookies using ornament- or tag-shaped cutters. Transfer cookies to a parchment-lined baking sheet and chill for 10 minutes.
- Bake until lightly golden, about 12 minutes. Cool completely on pan or wire rack before decorating.

You are so talented……
Thank you, Mrs Sylvia!! I’m just having fun 🙂
These are so cute! will definitely be borrowing this idea for future celebrations 🙂
http://www.racheltrieslife.com
Thank you! Go for it! 🙂
These are sooooo adorable and beautifully done! What a steady hand you have! Congrats to the happy couple!! 🙂
Thank you so much! It was a slow process at times, but it was so worth it! 🙂
Wow! You are such a neat icer! What a brilliant idea – they are looking absolutely fantastic!
Thank you!! I had so much fun icing them 🙂
You’re brave taking them on a plane! I loved the theme, and I wouldn’t mind a couple bites of the BBQ meat!
Haha, I know! I was nervous something would happen to them, so I packed them really well and held on tight to the box! Thank you! It was so good. 🙂
I loved reading this post! All the cookies are fantastic but my favorite were also the little “I Do” squares. Clever! What a very happy occasion and so glad you still had some cookies left over for us here at FF!!! Thank the bride and groom for sharing! By the way I also loved the menu (brisket and pork!)
Thank you so much! It was a fun one to write 🙂 So glad I could share the happiness with everyone! 😊
How wonderful, a great post, and it all has a meaning too! Loved all the messages on those cookies!
Thank you, Loretta! Yes, it was all very meaningful 😊 Such a special weekend! Thank you!!
wow those cookies are gorgeous, I’m so impressed! I made a whole bunch of decorated sugar cookies for a wedding once, they weren’t half as pretty as yours!
Thanks, Michelle!! I dont know about that..I bet they were fantastic! 😊
Pingback: Fiesta Friday Birthday Edition (FF39) | The Novice Gardener
I can’t decide whether they are more cute or gorgeous.
Thanks! ☺️
Absolutely beautiful. You have a wonderful talent, Anna!! Congratulations to your brother and his new wife! ❤
Thank you SO much! ☺️ I will pass the congrats along!
The cookies came out so well! I bet they were an absolute hit! And, I love all the wedding decorations as well. Thanks for sharing and Happy FF!
P.S: I love how you showed those decorations step by step, so now I feel as though I could be a cookie decorator too!
Thank you! Both the cookies and decorations were so much fun to make! Happy FF!
Oh, you can! If I can do it, so can you! 😃
Love the menu and the cute cookies. A great way to start a new life together 🙂
Thank you so much! Very true, I think they enjoyed the party 🙂
Pingback: One Year! The Baking Challenge Recap | thelittlebluemixer